-
Where are you going to put your sauna?
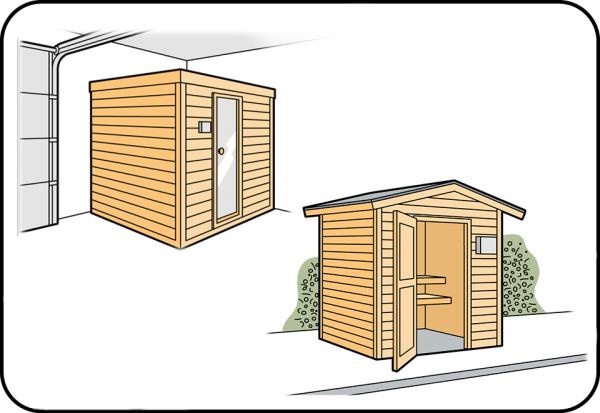
If you want to install a sauna in your home, in a room or a garage, the sauna will obviously have to fit into the available space. Measure the height, length and breadth, giving due consideration to awkward corners or edges. If you want to install your sauna in the garden, you will usually have more freedom with regard to size.
You will usually be able to install a sauna in the garden without any problems, provided you don’t exceed these dimensions. You can also build a sauna in an existing shed or garage or at the back of your garden. It may be wise to contact your local authority for advice about whether you need a building permit.
-
A sauna model that fits
Once you’ve measured the space where you want to install your sauna you can start looking for a model that fits that space. There is a range of sauna cabins, from compact ones for two to large cabins for more people. When calculating how much space you need it’s important to remember that the door always opens outwards. -
What type of wood should you choose?
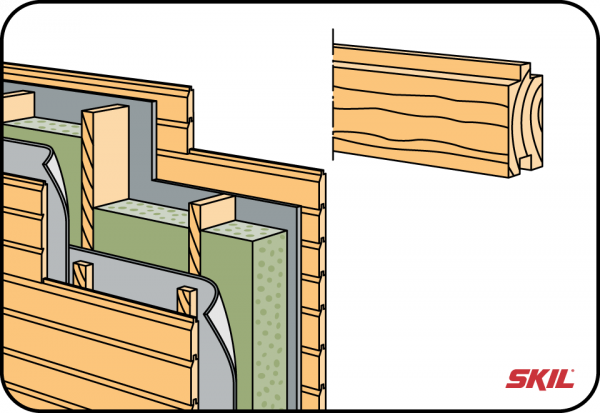
Not every type of wood is suitable for a sauna. Hardwoods like teak and oak will start smelling over time and are therefore less suitable. Pinewood is well suited, attractive and not so pricey. You can choose between a skeleton framework with insulation and vertical planks or heavy horizontal beams (like a log cabin). -
Install the sauna on stable foundations
You need to install your sauna on stable foundations. This can be floor tiles for inside or paving bricks and concrete in the garden. The foundations must be stable, the material is less important. -
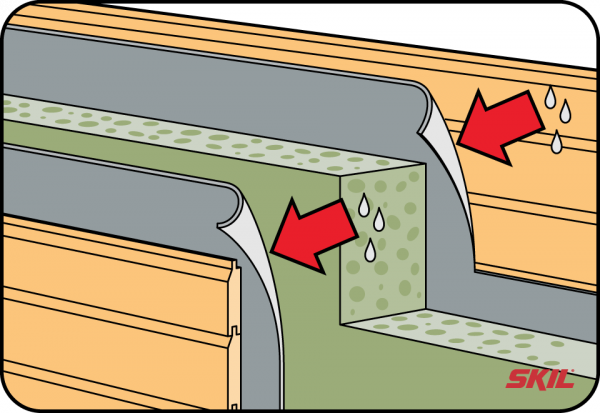
Insulation keeps the heat inside
You can insulate a sauna skeleton framework with various materials, including glass wool, stone wool and cork. Cork is the most environmentally friendly solution, but also the most expensive. You will have to place a damp-proof membrane on the inside of the sauna to prevent moisture penetrating into the insulation. -
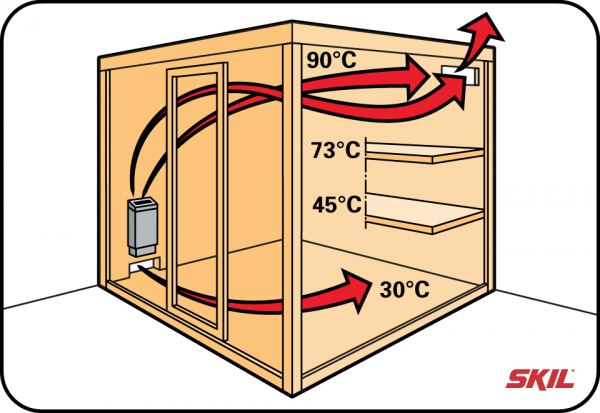
Ventilation is very important
As well as insulation, ventilation is also important for airflow. Oxygen needs to flow into the cabin from the inside. -
Sauna heating
You will obviously have to have a heat source for the sauna. There are various options: 1) An infrared cabin is less of a sauna and more of a heated cabin, with a maximum temperature of 40°-60°C. In an infrared cabin, light is emitted as radiant heat. This radiation acts deeply, which makes it pre-eminently suitable for people who suffer with aching muscles and joints or rheumatism. 2) An electric sauna heater is the most common option in homes. You need to choose a heater with sufficient power to heat the whole sauna. It’s best to connect the heater to the power supply with a well-insulated electric cable of sufficient diameter via a fuse box. 3) A wood stove is less well suited to small or outdoor saunas. A wood stove needs to be equipped with a smoke outlet, which will not usually be a problem in your garden. A wood stove does create a special ambience. What type of sauna you choose will depend on what you want to achieve and how you want it to look. -
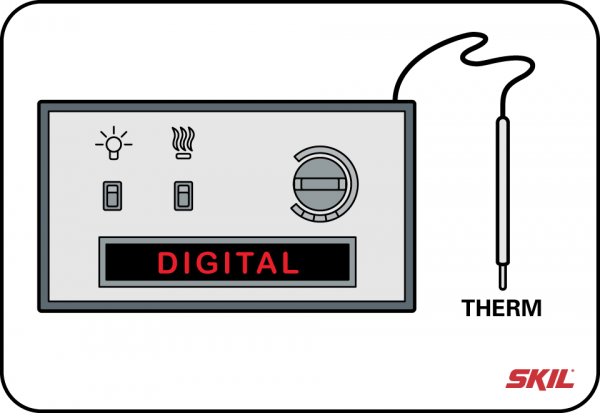
Heating your sauna
For your safety and convenience, you can control the temperature of the heat source in your sauna with a digital or analogue control unit. The control unit helps build the temperature pleasantly. That’s because your body needs time to get used to the heat every time you use it. -
Getting started
To ensure the best experience, make sure you have good-quality tools at hand. This will minimize your stress, and any difficulties or irritations while you work. Read the instructions carefully and take each step at a time. Take care of the sauna ventilation to ensure large quantities of hot air cannot escape. -
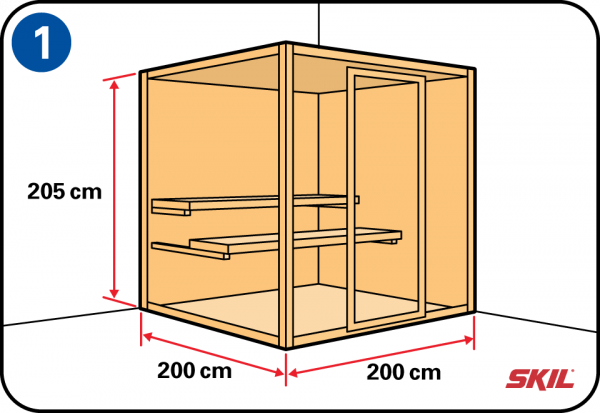
Step-by-step assembly
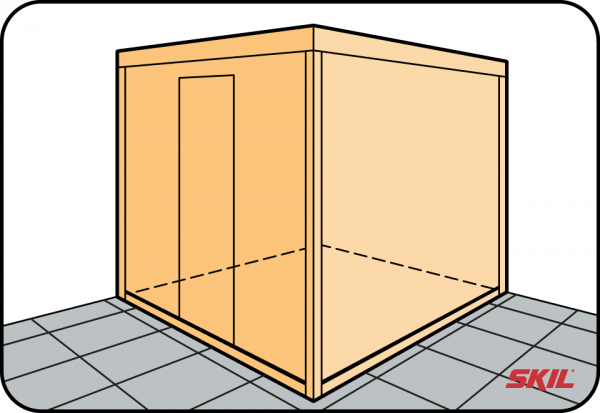
In this step-by-step we will build a solid pine sauna for installation in an existing shed, garden or home. The sauna will be ±205 cm high, ±200 cm wide and ±200 cm deep. The sauna is for 2-4 people and is available as a DIY kit with a 5 kW/380 v or 220v stove, sauna rocks, stove guard, two benches, two headrests, hard glass door with tinted insulation glass, sauna light and thermometer. -
Before starting sauna assembly
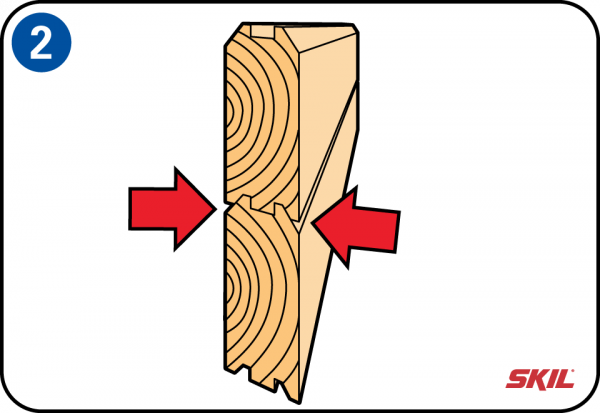
Read this step-by-step in full before starting to minimize the risk of assembly errors or damage. To ensure you can enjoy your sauna for many years, the planks or beams must fit together tightly and be properly sealed. The walls will have to be tightened in due course as the natural shrinkage and drying out of the wood must be compensated for. Small openings between the planks are a sign that the structure needs to be tightened. Wood is a natural product with versatile characteristics. You should inspect all planks before you start to ensure the best possible sauna assembly and finishing experience. If any of the planks are of a slightly lower quality, set them apart for use where they are less noticeable. -
Assembling the sauna walls
- The floor has to be level if you are to build a solid, stable structure. - A minimum working height of 2.2 m is demanded. - The sauna must be at least 5 cm from the wall. - The space in which you build your sauna must be adequately ventilated. -
Installing electrics
The electrics must be done by a qualified electrician in accordance with the guidelines and regulations applicable in the country in question. The supply cable is plugged into an (earthed) wall socket that can handle at least 230 v and 16A with a separate set of fuses. This wall socket should be placed around 20 cm above the sauna. -
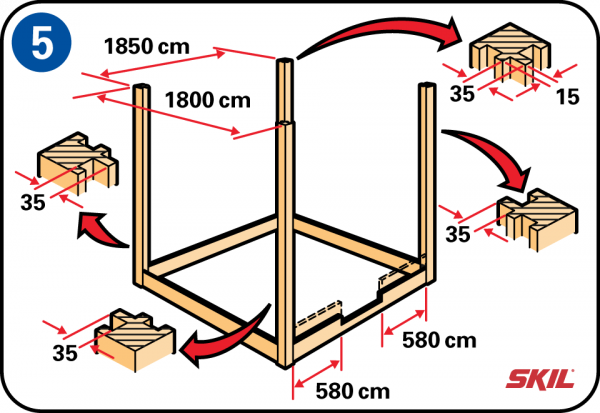
Assembling the base
Put the corner sections and the bottom beams in place. Note: the corner sections may differ depending on your DIY kit. Make sure you position them correctly. Check that you place them at least 5 cm from the wall. -
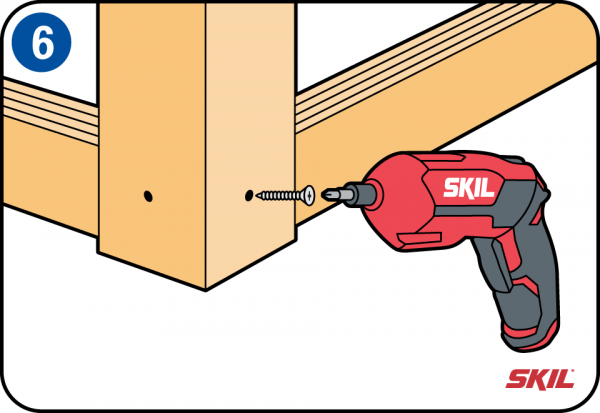
Screwing the bottom beams in place
Fix the four bottom beams to the corner sections with screws. -
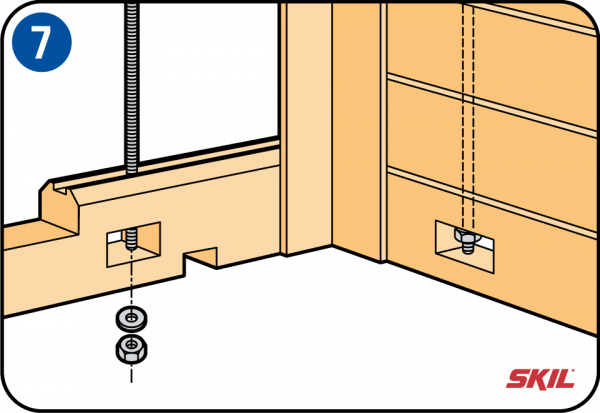
Putting the threaded rods in place
Place the threaded rods in the bottom beams and attach the washers and nuts. These ensure that the beams can be tightened when they are stacked up and create a good seal. -
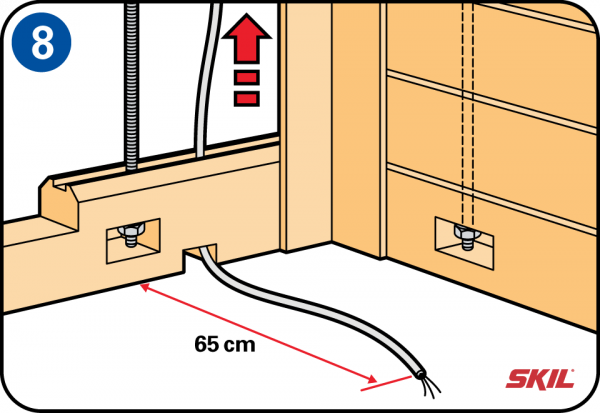
Passing the electrical cable through
Push the electrical cable through the beam opening at the front so that approximately 65 cm of the cable remains on the inside. -
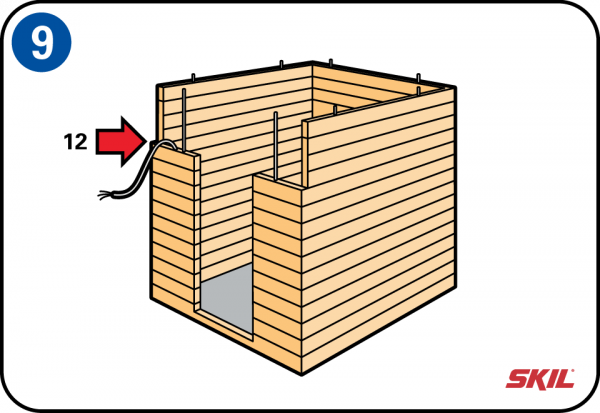
Stacking the beams on the sides
Stack the 15 beams on each of the three sides over the threaded rods including the top beams. Then place the short beams at the front and pass the electrical cable through the left beam all the way to the 12th beam. -
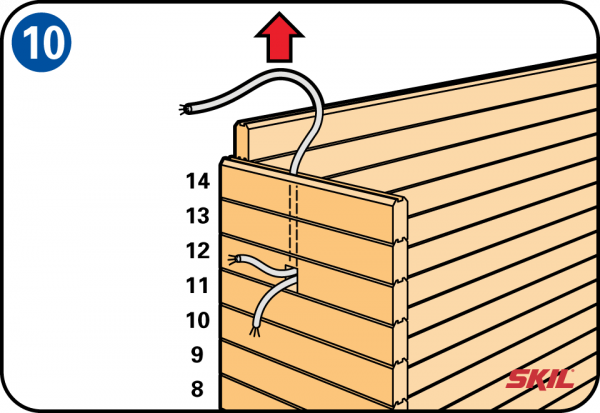
Passing the electrical cable through the top
Now put the two short beams in place and pass the electrical cable through to the top. -
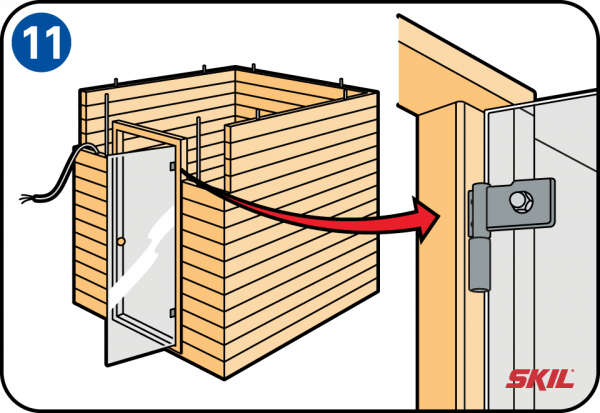
Putting in the doorframe
Place the doorframe with hard glass door between the short beams at the front. Fix the hinges with the bolts in the specially made holes in the doorframe. Attach the handle and tighten with the hand. -
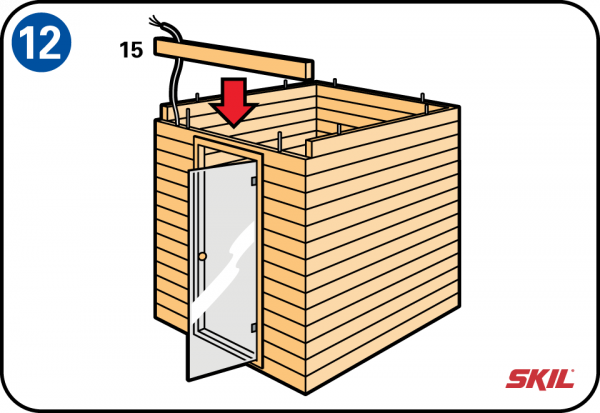
Placing the top beam (no. 15) at the front
Lastly, place the large beam, passing the cable through. -
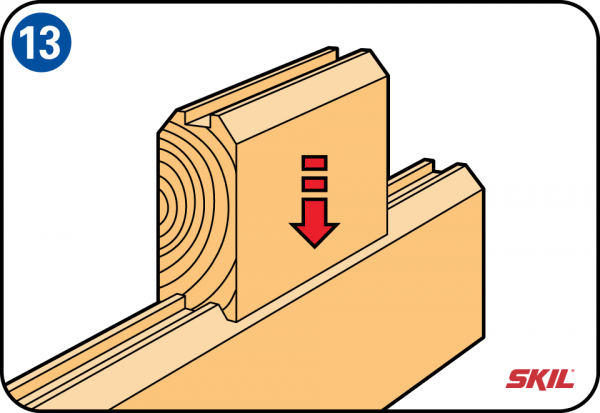
Tapping the beams from above
Now place a small piece of wood on the top beam and tap the beams from above with a sledgehammer to ensure they are fit together closely without any gaps. You can also do this while you are working to ensure all the beams are horizontally aligned. -
Securing the top
Screw the top on, using the 8 metal brackets. -
Screwing in the threaded rods
Now screw in each of the 8 threaded rods from the top, using a hexagonal nut and washer. Use a 13 mm washer and spanner to tighten the four sides of the sauna equally. You should repeat this step after a number of hours of use up to 70°C. The sauna walls can shrink approximately 2.5 cm during use. If you regularly use the sauna, you will need to tighten them up on a weekly basis over the first six months. -
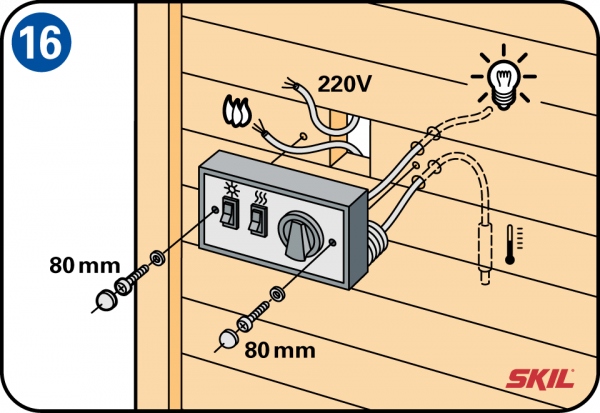
Connecting the control unit electrics
The electrical connections depend on the type and brand of stove and control system (check the electrical installation instructions for the control unit).
Drill two holes for the light and thermostat wires behind the control unit.
Fix the control unit to the front with two 80 mm screws.
The screws are secured with plastic washers. In a later step you can cover them with caps.Connecting the stove electrics:
You should connect up the electrical wiring before you install the stove itself. That’s because it’s easier to install a freestanding stove than to fix it to the wall (check the electrical installation instructions for the stove).
-
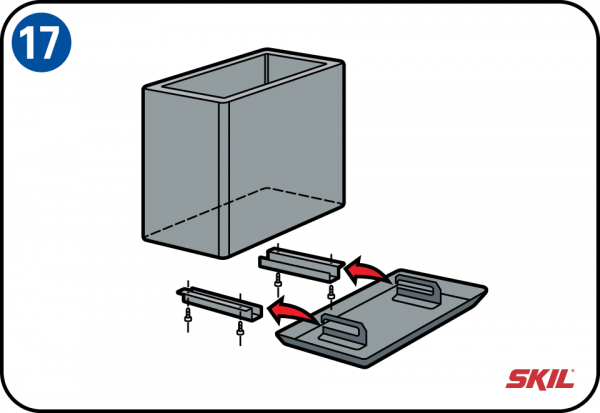
Fixing the water collection tank
You should fix the water tank in place before starting on the stove. Fix the two tank support rails with four self-drilling screws (12 x 4 mm). The tank itself is slid into place after the stove has been installed. -
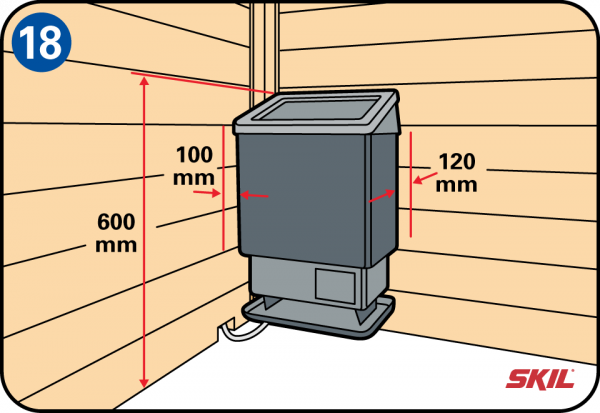
Stove and fittings
The stove can only be installed in a sauna made of untreated, resin-free wood. Check: • Voltage 220v or 380v and fuse • Stove connection conditions • Stove capacity must be suitable for the content of the sauna • The stove specs must be complied with The 8 kW stove chosen is suitable for a sauna volume of 7-11 m3. Stove performance is based on a constant ambient temperature of 18°C in a well-insulated sauna with proper ventilation. Gap between stove and left wall 100 mm, stove height 600 mm, gap between stove and right wall 120 mm. -
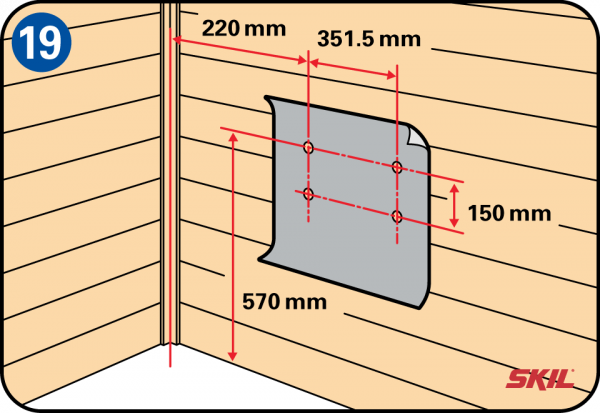
Fixing the stove in place
The stove is connected with the left wall, as this is where the socket is. To attach the wall plate, you need to drill four holes. The first hole should be drilled 220 mm from the side wall at a height of 570 mm; the second hole a further 351.5 mm from the side wall. Now drill two more holes 150 mm directly below the first two holes. You should drill to a depth of 3.5 mm to ensure the wood does not split. -
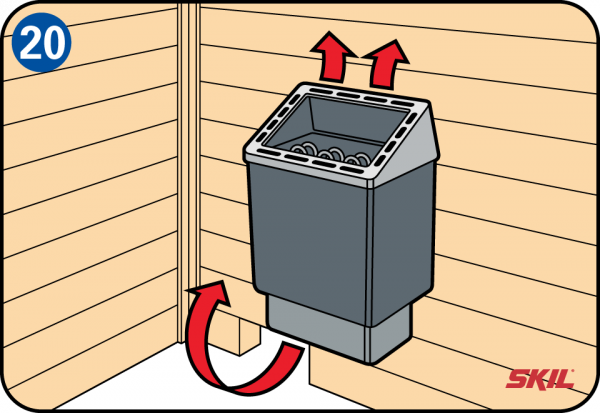
Air circulation
An air inflow opening must be made in the lower part behind the stove. This must allow at least 3000 mm2 of air to enter. The ventilation opening of the same size must be made diagonally in the other wall opposite the inflow opening. -
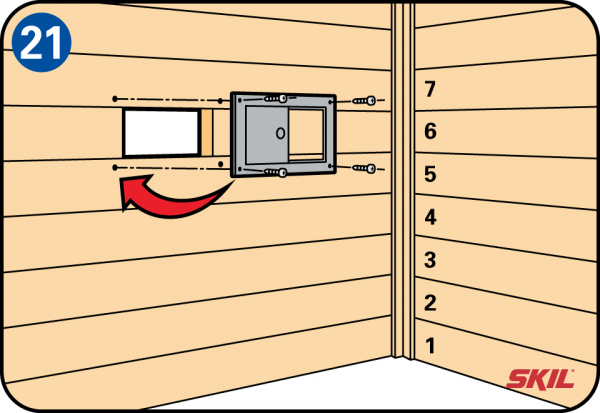
Ventilation opening
Mount the ventilation hatch with an opening between beams 5 and 7 on the left wall. -
Attaching the stove guard
Start by assembling the two parts of the stove guard as a corner piece. The stove guard should be attached 120 mm from the top of the stove (including sauna rocks). The minimum distance as depicted in the installation instructions must be complied with. Do not screw the stove guard to the wall until the stove has been installed. -
Sauna rocks
The stove must never be used without sauna rocks. It is advisable to clean the rocks with freshwater before placing them on the stove. The rocks must be placed loose next to each other so as not to obstruct the air circulation. Start with the biggest rocks, then add the smaller ones. When placing the rocks, take care not to change the distances between the heating elements. The rocks must not cause the electrical elements to come into contact with each other. Replace damaged or broken rocks to ensure the stove works well. Rocks of approximately 30-60 mm work best. -
Thermostat
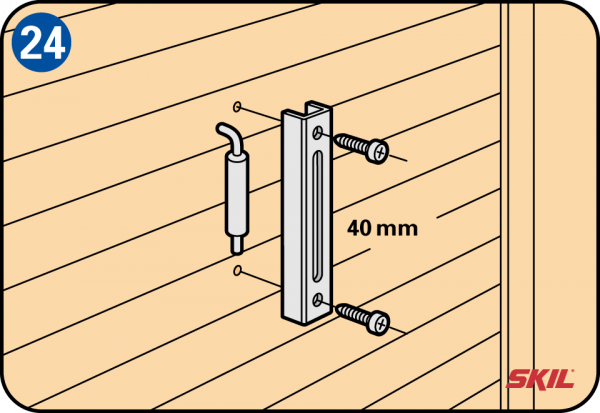
Install the thermostat in the sauna where the cable enters. Cover it with a wooden U section and screw it into place. -
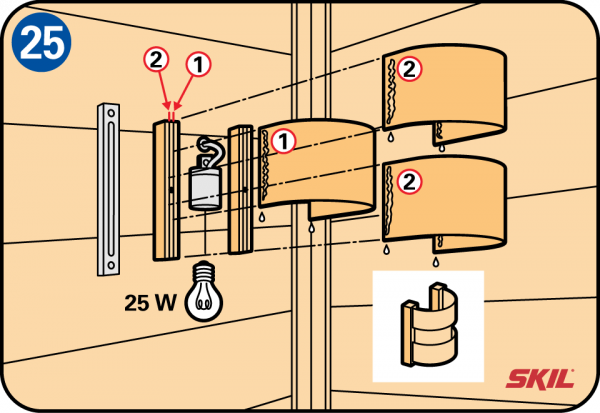
Light
A single approved sauna light may be installed at a distance of 500 mm from the stove. Attach the electrical cable to the connection clamp on the light fitting. Screw the two light holders to the wall where the cable enters. Use nothing brighter than a 25W light. To fix the lampshade in place: Dip both ends of the middle light strip in wood glue and fix it in place in the middle of the innermost slit (1) of the two light holders. Now dip the other two light strips in wood glue and place them in the outermost slits (2) of the light holders. -
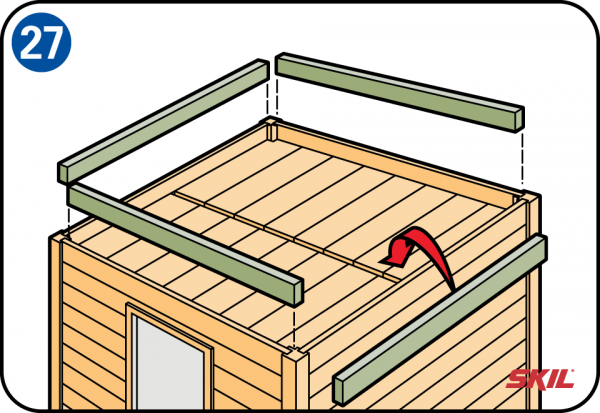
Ridge pieces and ceiling plates
Mark off 100 mm at the top of the wall for the joists. Screw the joists to the front and back walls. Now screw the other joists at the same height between the front and back walls. You can also do this from inside the sauna. The ceiling plates are placed loose on the joists. -
Top finishing and roof seal
Fill the space between the walls and the roof with the provided insulation strips. You should only attach the top cover pieces to the top of the sauna once the sauna is completely dry and tightened. This takes six months. In the meantime, you can affix the ridge pieces to the top horizontal planks. Never attach them to the vertical uprights as the horizontal beams can always sag due to shrinkage. -
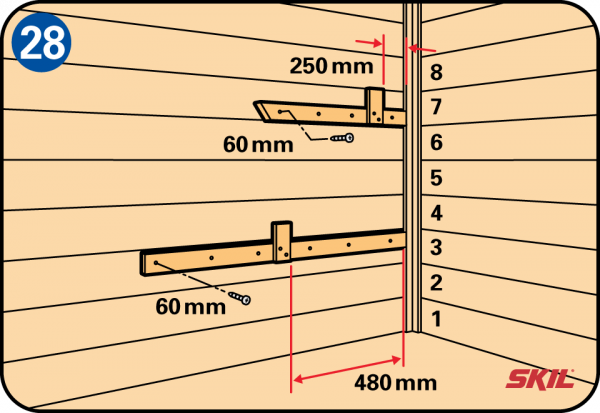
Installing the benches
The bench supports are affixed to the side walls. Mount the short strips on the supports to prevent the bench from moving around. Place the top one 25 mm to the left and right of the bench. The lower bench, measuring 185 mm x 60 mm, must be fixed at the same height as the bottom of wall beam no. 4. The top of the upper bench, which also measures 185 mm x 60 mm, should be at the same height as the top of wall beam no. 6. Use the screws 5 x 60 mm. -
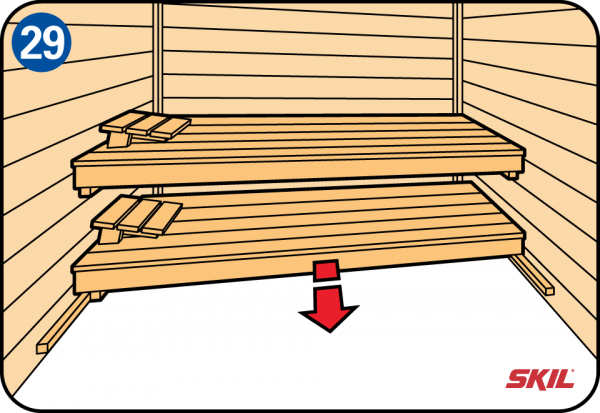
Headrests and duckboard
The lower bench can be slid out. The benches come fully assembled with six 10 mm-wide slats, 2 headrests and a 100 x 50 mm duckboard. -
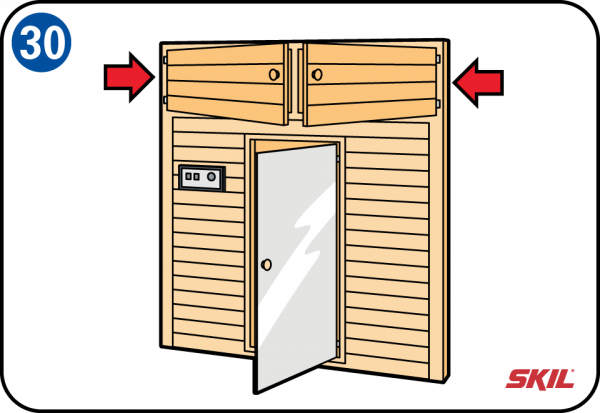
Using the upper space
The exterior height of the sauna is 205 cm, whereas the average height of modern living spaces is 265 cm. That means you have available storage space above the sauna. You can close off this space with two doors in the same style as the sauna. If you also have a small space available beside the sauna, you can think about building walls from aerated concrete blocks, tiling them and installing a walk-in shower with hot and cold water and drainage.